- Ceramics
- Artist Pages
- Asian Ceramics & Tea
- Ceramics Artist Links
- Ceramics Links
- Ceramics Terms Glossary
- Agateware
- Banding Wheel
- Bat, Throwing Bat
- Bisqueware, Biscuit Ware
- Blistering
- Blow Up
- Boat Anchor
- Calipers
- Carbon Coring, Black Coring
- Carbon Trap
- Chuck, Chum
- Coil
- Colorants
- Crazing
- Downdraft Kiln
- EPK, Edgar Plastic Kaolin
- Electric Kiln
- Extrusion, Extruder
- Fettle, Fettling Knife
- Force Dry
- Greenware
- Kaolinite
- Kilnsitter
- Overglaze
- Pinholing
- Plucking
- Pug Mill
- Pyrometric Cones
- Raku
- Rib
- Sgraffito
- Shelf Of Shame
- Slab Roller
- Slip
- Test Tile
- Knowledge
- Frequently Ignored Answers
- Photography
- Photographers
- Photo Links
- Raw File Converters
- Camera Simulators
- Color Vision Games
- Frequently Ignored Answers
- Resources
- Contact

Working With Leather Hard Clay Slabs
Preliminary Work:
Slab building is similar to woodworking, in that you are taking planks of material and cutting them into parts, which are then assembled into a final product. As making clay slabs requires time, effort and material, it is best to not only do thumbnail and full sketches, but to also create a dimensional plan before going to work, and to have some sense of the sequence in which parts should be created and assembled.
At a bare minimum to begin, you should have:
- Thumbnail sketches and a full sketch of the object.
- A diagram showing the overall dimensions of the object and how all its parts will fit together - this will determine the dimensions of the parts and how they must be cut.
- A list or sketch of the slabs you will need to cut and their dimensions, if not easily apparent from the diagram.
When designing your piece, remember that it is best to have the sides sit on top of the bottom slab, rather than joined to the edges of the bottom slab. This helps prevent cracking as the clay shrinks during drying and firing.
Like wood planks, clay slabs have appreciable thickness. You cannot form a square out of four equally wide pieces unless you stagger the joins, or bevel the edges and create miter joints as on a picture frame.
In examples a and b, each side is 8" wide by 1" thick. In a, two sides of the box are 8" across while the other two side are 8"+1"+1", or 10" across. Example b shows how a square can be made by staggering the joins; each side is 8" + 1", making a 9" square. Alternately, in example c, two sides are 8" across while the other two sides are 6"+1"+1", making an 8" square. In example d, all slabs are 8" and their edges have been cut at a 45° angle; they are mitered together.
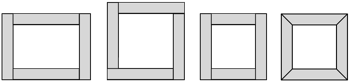
a. b. c. d.
In examples a-c, the slabs have been butted together, with the ends of some slabs cut flush (even) with the surface of others. No matter how perfectly smooth when joined, the joint will be visible in the end due to the slight difference in how much the clay shrinks depending upon how the clay particles are aligned. Mitered joints will be the least visible, but the hardest to cut (more below). Butt joins should be placed where they will be least conspicuous (not on the front of the piece) or somehow worked into the design.
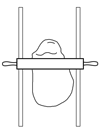
Rolling out slabs:
On a canvas sheet or canvas-covered board, pound and/or drop a chunk of clay until it is somewhat flat but still thicker than what you want. Get two sticks that are the thickness you want your slabs to be and lay them on either side of your clay, close enough together that the ends of a rolling pin can touch both of them. Use a rolling pin to flatten the clay more, working out from the center, until the rolling pin is rolling evenly on the sticks and the clay is flat. If possible, rotate the clay and roll it in different directions so it does not develop a grain and shrink more in one direction than others. Roll the slabs out a little larger than you want your final pieces to be.
Roll out all the material you need for your piece at one time, so that it all dries evenly. It is a very good idea to roll out some extra material, in case everything does not go perfectly according to plan.
Drying & Cutting slabs:
- For leather hard slabs, let the clay dry just enough so that it doesn't bend when picked up - you still want it wet enough so that it cuts and joins well.
- Lay out your paper pattern pieces as you wish to cut them, or measure out and check your pieces using a ruler and right triangle. Use a thin needle to cut the clay. Hold it straight up and down - make sure you are not undercutting the clay. For straight sides, use a ruler along the edge to help guide the cut.
- To check if your cut is vertical, stand the slab on its cut side: if the slab stands straight up the cut is good.
- Cut in from both ends toward the middle so you don't tear out clay at the end of the cut.
- For a 45° beveled edge (a mitered cut), cut the slab to its maximum outside dimensions. Using an example of a 10mm thick slab, then line up a ruler parallel to the edge you want to bevel and 10mm (the thickness of the slab) back from it. Cut with the upper part of the needle running along the ruler and the tip of the needle running just outside the bottom edge of the clay. (Or, you can make or buy a bevel-cutting tool, such as this one you just slide along the edge). Again, be careful not to tear out clay at the end of the cut.
Joining slabs:
- Join one wall at a time to the bottom. Thoroughly slip and score all the sides and edges that will touch each other, then press the wall in place. Give it a tap or two with a paddle to seat it, check if it's vertical with a right angle (if you want it vertical), and wipe away excess slip. Repeat the process, checking the alignment of all pieces each time, as things can shift.
- Join the walls in such an order that the last piece butts up against the others rather than slides in between them.
- When all done, clean up the seams, wrap the piece in plastic and let the moisture content even out in the piece - the seams need to firm up before continuing.
Finishing:
- If desired, roll out very thin coils of clay and press them into the seams along the inside to make smooth concave joins, or fillets, between pieces.
- Bevel and smooth all edges. This is what sets quality work apart from beginners'. Lay a ruler parallel to an edge, a millimeter or so back from it. Run a fettling knife or loop tool along the ruler at a 45 degree angle, cutting off (beveling) the edge's sharp corner and creating a bevel. Repeat this for all edges, then go back with your finger or a damp sponge and smooth/soften the edges until you are satisfied.
Vocab:
- Bevel
- Flush
- Fillet
- Miter

time well spent
time to explore
time flies